Sneak Peak
Monday, 5 August 2013
DIY ombre jeans. All you need is some hangers, pegs, bucket, water, bleach. More about it in the coming post! Sorry for the long absence was busy with every week having presentation, assisgnments and discussions. There no tests now, and just think, next will be every week of all that plus tests! Oh help!
Have a great week ahead! :)
Labels:
College Life,
DIY,
Fashion,
Frustrations,
Ups and Downs
DIY Bleach/ Faded Jeans
Monday, 22 July 2013
Morning guys! Hope you had a great weekend and all ready for the week ahead! :)
Just want to start this week with something I love, yep, DIY (and I hope it'll turn out well). Firstly it was originally the plan to bleach the jeans to ombre shade but I'm only halfway there for now and I actually quite like the colour of the jeans now so I thought why not I do a post on how to bleach it to a lighter (or faded) shade :)
First off you'll need an old pair of jeans (you don't want to ruin your newly bought ones just in case it doesn't turn out the way you liked). Scissors (really sharp ones with small pointy ends) and sand paper (optional - for the worn out look). Not forgetting also bleach, warm water, and bucket.
Cut your jeans to the desired length and small holes where you preferred it to be. Started fraying them by using the pointy ends of the scissors to pull out small threads at the end of the cut edge (this might take a while depending on how frayed you want it to be).
Optional step: Use a snadpaper to brush it along your jeans for a really worn out look.
After you're satisfied with the way your jeans look, time to fade those colours! I preffered mine to be quite faded so I soak it in 1 part bleach, 3 part warm water for quite sometime. Remember to check the progress once in a while to see how far it has faded.
Note: The water might turn pale yellow but it's okay you can wash it out afterwards (works for me! maybe it'll have to depend on the type of jeans you have).
After you're satisfied with the colour, take it out of the bucket using rubber gloves and wash it a couple of times in the washing machine to remove the bleach and the yellowy stain. Dry it in the dryer and you've got yourself a new pair of lovely faded short! :)
Ps: For a clearer bleaching process/ instructions, google would help. That's how I learnt mine :p Good luck! xx :)
Labels:
DIY,
Fashion,
Happy Things,
Inspirations,
Love
Summer Colours
Tuesday, 11 June 2013
Love how the sun makes the colours look bright and fetching. Summer. The time for romance. Time for flowery patterns and shorts and summer dresses. Time for fun and adventure. How has your summer been so far?
One more day and I'm close to completing another item on my bucket list. Just one more day. Jogging is fun but to do it everyday needs determination and yep, lots of stamina which unfortunately I seemed to lack. Till tomorrow then, and I'd have jogged in the morning for a whole week!
Have a happy Tuesday ahead!
xx :)
Labels:
Appreciation,
Colours,
Fashion
Leather & Jeans Pouch
Friday, 31 May 2013
Hey guys how's life? It's finally Friday and today's the last day of my DIY week challenge and I'm bringing you something cute - a leather and jeans pouch! It involves a simple few steps and can be completed in a few minutes. What are you waiting for? Let's get down to it! :)
Things you'll need:
Jeans fabric
Leather fabric
Scissors
Long chain
Button
Needle & thread
Measure how big you want your pouch to be and cut two using the jeans fabric. I want mine around the size of my handphone. For the flap, cut approximately the width a tad smaller than the width of your pouch with any shape you prefer.
Sew on the flap. I sew it on with X's stitches. This will be the back part of the pouch.
For the front part, sew on a button where you want it to be. I added on a bit of decoration with the left over leather fabric I have.
After the front and back are done, sew them together wrong sides facing inwards with a single stitch.
Cut a slit on the flap for the button.
Cut two small slits just enough for the chain to go through at the back part of the pouch.
Done! :)
Labels:
Accessories,
DIY,
Fashion
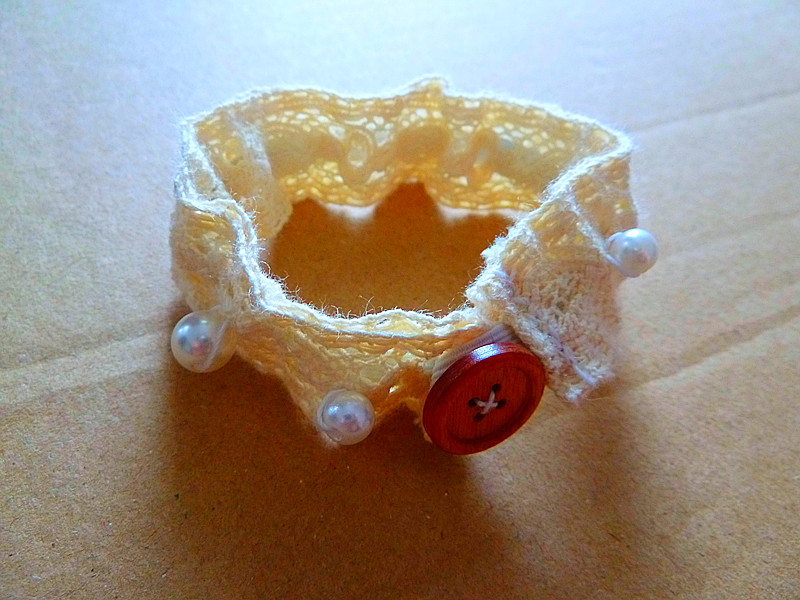
Lace Bracelet
Saturday, 25 May 2013
Happy weekend! Yes I'm very happy weekend's here but one down part though, final exam is in two days' time and I've yet to study some more! :(
Oh wells, gloomy stuff aside, let's talk about creative stuff! Finally after a week of laziness I went out for a mini shopping and also to go get some lovely fresh summer air! It's been awhile cooping up in my room because of warnings that it's not very safe to go out this week (racial stuff very bad I know!).
This time I managed to remember to snap a few in-the-process pictures I hope they helped! One DIY lace bracelet coming right up! :)
Things you need:
Couple of beads or pearls for vintage/ boho feel
An old button to act as clasp (or something!)
Thread and needle
Scissors
Elastic band
Lace ribbon
Measure the length of elastic band around your wrist plus an inch for a small loop. Sew the loop on one end of the elastic (make sure the loop fits the button!).
Measure lace ribbon to be the length of the elastic band plus 1.5 inches. Cut two strips of the same length. Fold the end of the ribbon down a bit and sew a small tiny hem. Apply the same thing for all four ends of the lace ribbons.
Sew two ends of the ribbons just below the elastic loop, while the other ends matching the other end of the elastic band.
Decide which side is to be the top side, and sew on beads or pearls randomly. Add a small button to the opposite end of the loop-ended elastic.
Sew the two opening sides of the bracelet together (make sure you don't accidentally sew them together with the elastic band which I almost did!).
And...you're done! :)
Have a happy weekend! :)
Labels:
Accessories,
Colours,
DIY,
Fashion,
Inspirations,
Love
Photography And More
Saturday, 18 May 2013
Whew! 'Twas a tiring day today but definitely fruitful! :)
Had a wedding marathon today, attended two wedding masses and ate tons of food! If this keeps up I can finally have that weight gain I've been wanting since I became as thin as a stick from childhood! :p
Get to take quite a few outdoor pictures and practise a bit of close up shots as today's weather is superb and it feels really like summer now, with the sun shining as bright as ever and not a dot of cloud in sight. Didn't have time to take a proper OOTD photo though as was in a rush so these will have to do, sorry!
Outfit theme: Bright and cheerful a.k.a. polka dots!
Hot day today!
Church adjacent building.
Few odd plants around the church compound. Ain't it lovely to see them bloom? :)
N waiting patiently for me while I ran around here and there taking pictures.
Eagle chain I gave him as our anniversary gift.
Hope I've improve in my photo taking. Can't wait to experiment more!
xx :)
Labels:
Accessories,
Colours,
Fashion,
Happy Things
Friday's Letters {5}
Friday, 17 May 2013
Dear weather, just when I wanted to go out you started raining. And I've thought out a nice sunny day date outfit too. But it's okay. A change of a simple outfit for a simple movie date will do too :)
Dear Pancake House, you are still one of our favourite places to dine. I love the wall decor! :)
Dear cashier, thank you for allowing us to buy tickets at student's price! It was a nice and affordable Star Trek movie for two!
Dear night sky, thank you for holding up and staying beautiful and clear. I love the stars that you hung out for our date tonight! :)
Dear Jesus, thank You for reminding us that You are always here for us even in our everyday busy and hectic lives. Thank You for calling us here to experience Your true peace and joy :)
Dear N, thank you so much for an amazing tonight. I had a wonderful time with you as always. Thanks for bearing with me and helping me taking pictures when I know you're dead tired of walking. You're the best! :)
Overall I had a nice day today. Hope your Friday is good too! :)
Labels:
Appreciation,
Black and White,
Fashion,
Friday's Letters,
Happy Things,
Leisures,
Love
Polka Dots Nail Art
Tuesday, 7 May 2013
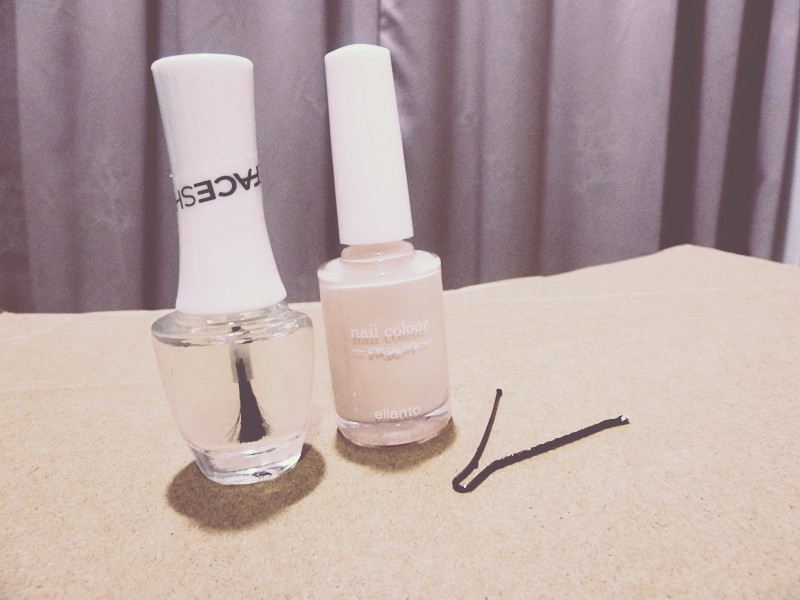
Simple and easy nail art! All you need is one transparent nail polish, one milky colour nail polish (or any bright colour of your choice), and a dotting tool (I used the blunt end of a hair pin since I do not own a dotting tool).
Apply a thin coat of transparent nail polish as a base. Let dry. Use dotting tool to dot on polka dots randomly. Let dry. Cover with another top coat of transparent nail polish and you're done! Easy right? :)
Ps: Election has ended but a lot of conflicts may arise. Please do pray for my country so that there will be peace and justice.
Tattoo Inspo
Wednesday, 24 April 2013
Last inspiration post for the week. Am really sorry haven't been up to much lately as am busy with packing all the stuff I'm going to move (TOMORROW!). Really can't wait for it to be over, where I can settle down and think up all sorts of decor for my new room! :)
For today, I'm going to show you a few inspiration pictures I've found on Pinterest (seriously one of my favourite sites!) about tattoo. Nope I'm not brave enough to go try a real one (and I do get tired of things easily!), so I thought of doing a temporary one, with tattoo ink!
These are a few I've found and caught my eye. Am thinking of maybe doing one on the back or behind the ear? Hmmm.
Be patient with me while I get ready for moving and settling down. After that, time to do all the projects I've been inspired to do lately! Can't wait! :)
Ps: Updated new button for blog. Do share the love and contact me for more sizes! :)
Labels:
Fashion,
Inspirations
Subscribe to:
Posts (Atom)