Card Making
Sunday, 8 December 2013
It's easy really. You don't need anything much. Just papers, watercolors, paintbrushes, water, palette. And of course, an enthusiastic heart. I've always believed that we can do anything we want as long as we believe in it hard enough and work hard for it. Nothing's impossible, right? And all things are possible as long as we keep the faith.
Exam's coming up. Stress is piling up and deadlines to meet draw nearer and nearer. Only thing to do now is to take a deep breath and don't let life overwhelmed you. Do what makes you happy. Smile. And be with loved ones. At the end of the day, when you think back to what really matters, simple small things, people we love, it's all worth it. Life.
Have a great weekend ahead friends! :)
Labels:
Appreciation,
Colours,
DIY,
Inspirations,
Leisures,
Love
Chin Up!
Tuesday, 1 October 2013
Rag cloth ribbon. I just used an old colourful cloth to wrap it around my braid a few times to give it a more country, carefree and well, bohemian look. Love the warm colours of the fabric.
When life gets you down, give it a smile, get back up and tell yourself you're gonna make it through. It's a new day, and anything might happened. Don't go search for a miracle. Appreciate one right in front of you.
Hope your Monday was okay. Mine was good! :)
Labels:
Appreciation,
College Life,
DIY,
Happy Things,
Lesson,
Quotes
more on thoughts
Sunday, 22 September 2013
Life lately has been very stressful as you can tell by the lack of posts. Time is limited and whenever there's free time, it is used up for a much needed rest. Today, however, the crave to do something creative overrides the need to rest. Spend time polishing up my painting skills and yes, amidst the hustle and bustle of life, the need to find back all those things that I used to do when I was a kid is in a kind of a way, relaxing. All those childish impulse, those childish hobbies that we cast aside as well, childish, are actually what tells us that we enjoy doing.
Also, amidst the busy-ness of life, thoughts about life's true purpose came pouring in. What we make ourselves do everyday, each day's routine, responsibities, what does it all amount to at the end of the day? Does it fulfill the purpose of us being here or we are just following each others' footsteps in doing what should be done as taught by the society?
Deep. Reflections. And Stressed. These words just about summed up my life as a sonographer trainee lately.
Labels:
College Life,
Colours,
DIY,
Lately,
Ups and Downs
Sneak Peak
Monday, 5 August 2013
DIY ombre jeans. All you need is some hangers, pegs, bucket, water, bleach. More about it in the coming post! Sorry for the long absence was busy with every week having presentation, assisgnments and discussions. There no tests now, and just think, next will be every week of all that plus tests! Oh help!
Have a great week ahead! :)
Labels:
College Life,
DIY,
Fashion,
Frustrations,
Ups and Downs
DIY Bleach/ Faded Jeans
Monday, 22 July 2013
Morning guys! Hope you had a great weekend and all ready for the week ahead! :)
Just want to start this week with something I love, yep, DIY (and I hope it'll turn out well). Firstly it was originally the plan to bleach the jeans to ombre shade but I'm only halfway there for now and I actually quite like the colour of the jeans now so I thought why not I do a post on how to bleach it to a lighter (or faded) shade :)
First off you'll need an old pair of jeans (you don't want to ruin your newly bought ones just in case it doesn't turn out the way you liked). Scissors (really sharp ones with small pointy ends) and sand paper (optional - for the worn out look). Not forgetting also bleach, warm water, and bucket.
Cut your jeans to the desired length and small holes where you preferred it to be. Started fraying them by using the pointy ends of the scissors to pull out small threads at the end of the cut edge (this might take a while depending on how frayed you want it to be).
Optional step: Use a snadpaper to brush it along your jeans for a really worn out look.
After you're satisfied with the way your jeans look, time to fade those colours! I preffered mine to be quite faded so I soak it in 1 part bleach, 3 part warm water for quite sometime. Remember to check the progress once in a while to see how far it has faded.
Note: The water might turn pale yellow but it's okay you can wash it out afterwards (works for me! maybe it'll have to depend on the type of jeans you have).
After you're satisfied with the colour, take it out of the bucket using rubber gloves and wash it a couple of times in the washing machine to remove the bleach and the yellowy stain. Dry it in the dryer and you've got yourself a new pair of lovely faded short! :)
Ps: For a clearer bleaching process/ instructions, google would help. That's how I learnt mine :p Good luck! xx :)
Labels:
DIY,
Fashion,
Happy Things,
Inspirations,
Love
Girly Fun
Tuesday, 18 June 2013
Things you need:
Pale colour nail polish
Transparent/ clear nail polish
Sticky tape
Scissors
How to:
1. Cut ten small strips of sticky tape and stick them onto your nails covering half your nails near the bottom part closer to the cuticles.
2. Using a bright colour or pale colour polish apply onto uncovered part of your nails and let dry before stripping off the tapes.
3. After that, apply clear nail polish on your nails to give it a shiny look before applying topcoat as a second protective layer.
4. Let dry and you're done! :)
Dragon Boat Festival
Wednesday, 12 June 2013
Every 5th of May in the Lunar Calendar the Chinese celebrates the Dragon Boat Festival. You may or may not have heard about it but to summarize, it is quite a big festival usually where there'd be dragon boat races and making of dumplings. If you're not sure about this, simply go to Google home page and you'll see a cute dragon boat design, click it and you'll find out more! :)
Well as for me today, went around did errands and managed to snap a few pictures and practised my close up shots in between. Celebration of today's fest may be postponed to the weekend for us as by then most of our family members will be here.
Happy Dragon Boat Festival ya'll! And I hope you're lucky enough to taste a few yummy dumplings! :)
Last but not least, one of my summer DIY-es sneak peak! I do so love the fresh colour of this flower print. Do you? :)
Labels:
Appreciation,
Celebration,
Colours,
DIY,
Food,
Happy Things
Leather & Jeans Pouch
Friday, 31 May 2013
Hey guys how's life? It's finally Friday and today's the last day of my DIY week challenge and I'm bringing you something cute - a leather and jeans pouch! It involves a simple few steps and can be completed in a few minutes. What are you waiting for? Let's get down to it! :)
Things you'll need:
Jeans fabric
Leather fabric
Scissors
Long chain
Button
Needle & thread
Measure how big you want your pouch to be and cut two using the jeans fabric. I want mine around the size of my handphone. For the flap, cut approximately the width a tad smaller than the width of your pouch with any shape you prefer.
Sew on the flap. I sew it on with X's stitches. This will be the back part of the pouch.
For the front part, sew on a button where you want it to be. I added on a bit of decoration with the left over leather fabric I have.
After the front and back are done, sew them together wrong sides facing inwards with a single stitch.
Cut a slit on the flap for the button.
Cut two small slits just enough for the chain to go through at the back part of the pouch.
Done! :)
Labels:
Accessories,
DIY,
Fashion
Lately {7}
Thursday, 30 May 2013
Lately it's been all DIY stuff as I gave myself a challenge, that is, to do DIY stuff for a week. So far I've finished 6. Another one to go and I'm done!
Hope your week is as productive as mine! xx :)
Linking up with Heather today! Head over to her blog and check it out! :)
Labels:
Accessories,
DIY,
Happy Things,
Inspirations,
Lately,
Love
Vintage Stones
Thursday, 30 May 2013
Have you ever wanted to decorate your jewelry beads or stones to make it look more vintage but not sure how to? Well I've tried something on my own and I love it! Maybe you can make it into a ring, a necklace or bracelet charm, the possibilities are endless! Here's a simple how to:
Things you'll need:
Soft and flexible wire
Beads or jewelry stones with a hole in the middle
Scissors
1. Cut the length of wire to be approximately 8 times longer than the beads or stones. Make sure the ends are folded in to prevent scratching.
2. Insert wire through the hole in the middle of the jewelry bead/ stone and position the stone around the middle of the wire.
3. Fold the wire anyway and any direction you please to create a pattern you prefer.
4. Upon reaching the end of the wire, twist the two ends of the wire together as shown.
Done!
Now you can try it out on other shapes and sizes of jewelry beads/ stones instead. Have fun! :)
Labels:
Accessories,
DIY
Leather Clutch/ Purse
Wednesday, 29 May 2013
And so another day of challenge commence! Found this lovely idea on the internet while browsing out leather projects (yes I know a lot of leather stuff lately!) so I did it! Can't say I'm not please with the outcome. It's really simple and easy (as with all my DIY-es) and come let's do it together! :)
Things you'll need:
Leather fabric
Scissors (one big and one small)
Two faux suede strings
I used the big fabric scissors to cut the leather into a long rectangle and folded it three-ways as shown. If you prefer, just fold it in three equal parts will do too.
This part is a bit tricky. Since I do not own a leather punch, I have to make do with just using a small sized scissors. You can either cut small slits at the side (make sure to measure first the gap you prefer) or poke holes in it using the pointy end (which I did!). After that, weave the faux suede string around the side to kind of stitch it up and make a small pouch. Start from one side, and stop when you reach the middle.
It should looked like this after you've sewn up both sides.
For this part, loop the remaining strings on your fingers and tie it as shown above. After that, cut the bottom part into a fringe.
Inside should look like this.
No sewing needed! And you have yourself a leather clutch/ purse :)
Labels:
Accessories,
DIY,
Inspirations,
Love
Leather Necklace
Tuesday, 28 May 2013
DIY week challenge day 4! Leather necklace boho style hope you'll like it! :)
Things you need:
Scissors
Glue gun
leather fabric
faux suede string
Cut the piece of leather fabric around the size you want it to be. I want mine not very big so I cut a mini size one (my advice will be fold the leather in half and cut it for symmetrical shape).
Next, cut fringes as shown for more texture.
Use a glue gun to apply glue where you want it to be. Make sure you don't glue the top part as that's where the faux suede string will be inserted.
Lastly, insert the string at the small openings and tie a knot at the ends. Done!
Easy and simple :)
Labels:
Accessories,
DIY
Mini Notepad
Monday, 27 May 2013
Hi guys! Am having a bit of Monday blues as yep today is finally my final exam!!! Super duper nervous!! Pray for me so that I'll do well? :)
A simple something to cheer myself up, below is a DIY/ refashion of a mini notepad (or pocketbook, which I quite like the sound of it!) and it's pretty simple really. Remember the lace bracelet DIY I've posted? I just use some of the leftover lace to do it. Here goes!
Thing you need:
A small notepad
Printed fabric
Lace ribbon
Glue gun/ super glue
First off measure the part of your notepad where you want to cover and cut the fabric according to size. Measure a strip of lace ribbon as the width of the notepad and cut it accordingly. Use a glue gun, or just any long lasting super glue, glue the fabric then the lace, in that order and tada! You have refashion yourself a new simple notepad! :)
I know lately there's been a splash of ideas and I'm loving it! Maybe we'll see if I can do a DIY marathon and do it for a week straight! It's definitely a challenge but I'm willing to take it on! :)
Hope your week is off to a great start and have a happy Monday! :)
Labels:
College Life,
DIY,
Refashion
Jar of Advice
Sunday, 26 May 2013
Right, so without lingering any longer let's get down to it!
All you need:
A big empty jar
Colour strips with one side blank to write words on
A pen
A bible
Find a quote that you think is nice, write it on the blank side of the strip and fold it into a star!
Pop the star into the jar for further use and now try making more stars!
Simple and easy? I bet it'll look nice once I've filled the jar with colourful stars and use it also as a decor.
Have a blessed Sunday! :)
Labels:
DIY,
Inspirations,
Quotes
Lace Bracelet
Saturday, 25 May 2013
Happy weekend! Yes I'm very happy weekend's here but one down part though, final exam is in two days' time and I've yet to study some more! :(
Oh wells, gloomy stuff aside, let's talk about creative stuff! Finally after a week of laziness I went out for a mini shopping and also to go get some lovely fresh summer air! It's been awhile cooping up in my room because of warnings that it's not very safe to go out this week (racial stuff very bad I know!).
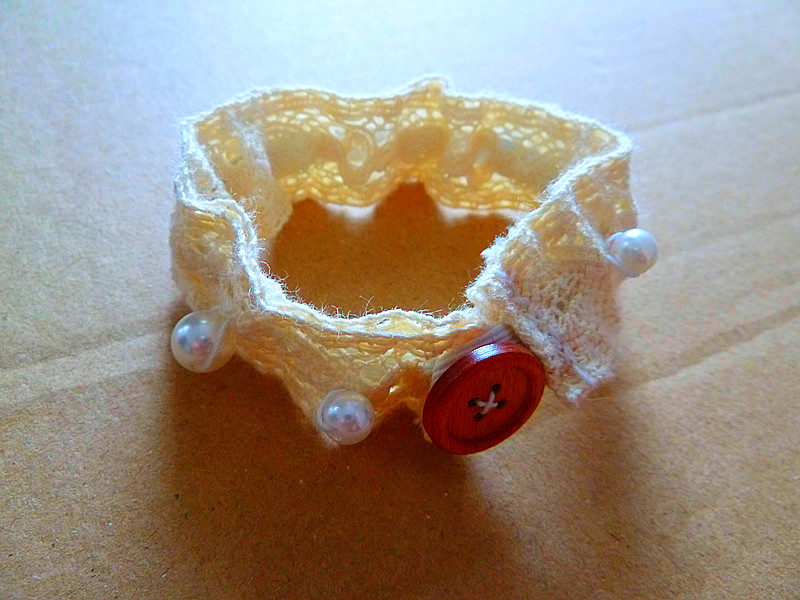
This time I managed to remember to snap a few in-the-process pictures I hope they helped! One DIY lace bracelet coming right up! :)
Things you need:
Couple of beads or pearls for vintage/ boho feel
An old button to act as clasp (or something!)
Thread and needle
Scissors
Elastic band
Lace ribbon
Measure the length of elastic band around your wrist plus an inch for a small loop. Sew the loop on one end of the elastic (make sure the loop fits the button!).
Measure lace ribbon to be the length of the elastic band plus 1.5 inches. Cut two strips of the same length. Fold the end of the ribbon down a bit and sew a small tiny hem. Apply the same thing for all four ends of the lace ribbons.
Sew two ends of the ribbons just below the elastic loop, while the other ends matching the other end of the elastic band.
Decide which side is to be the top side, and sew on beads or pearls randomly. Add a small button to the opposite end of the loop-ended elastic.
Sew the two opening sides of the bracelet together (make sure you don't accidentally sew them together with the elastic band which I almost did!).
And...you're done! :)
Have a happy weekend! :)
Labels:
Accessories,
Colours,
DIY,
Fashion,
Inspirations,
Love
Subscribe to:
Posts (Atom)