Card Making
Sunday, 8 December 2013
It's easy really. You don't need anything much. Just papers, watercolors, paintbrushes, water, palette. And of course, an enthusiastic heart. I've always believed that we can do anything we want as long as we believe in it hard enough and work hard for it. Nothing's impossible, right? And all things are possible as long as we keep the faith.
Exam's coming up. Stress is piling up and deadlines to meet draw nearer and nearer. Only thing to do now is to take a deep breath and don't let life overwhelmed you. Do what makes you happy. Smile. And be with loved ones. At the end of the day, when you think back to what really matters, simple small things, people we love, it's all worth it. Life.
Have a great weekend ahead friends! :)
Labels:
Appreciation,
Colours,
DIY,
Inspirations,
Leisures,
Love
Time Off
Saturday, 23 November 2013
Sometimes, the best things to do when you're stressed are the things that are simple yet delightful. Like drawing, for instance.
Labels:
Black and White,
Colours,
Inspirations,
Love,
Ups and Downs
Peacock Nail Art (Fall)
Wednesday, 2 October 2013
It's officially October! New month is starting and new things are changing. First off, fashion. A simple DIY nail art to suit the season, and the theme is one of my favourite, blue!
Begin by cleaning your nails so that there are no chipped nails nor dirt on it. After cleansing, apply a coat of base coat for nail protection and let dry. First color to use would be something light and i picked pale blue. Let dry before applying second coat of a darker color shade of blue on top as shown in the second picture (note that I left a bit of pale blue showing at the base). Lastly, I used black as the last coating and similarly, apply as shown in the third picture where it shows the previous color before.
Let dry and you're done! Simple, easy and it reminds me of a peacock's feather thus the peacock nail art! Do try experimenting with different colors to create your special palette of colors. Have fun! :)
xx.
Labels:
Appreciation,
Colours,
Inspirations,
Nail Art
Lately {13}
Friday, 30 August 2013
1. Christa, one of the funniest people I know in college. Just by hearing her laughter is enough to make you smile.
2. Attended a Nick Vujicic (was taught to pronounce his name as Vui-jic) talk last night. It was really motivating and inspiring. Am grateful that I was invited (for free!) to attend that talk. Surely everything must happened for a good reason and we're all there for a reason too? :)
3. Lovely sunrise. Can't resist to take a snap when I saw it. Don't you just love it?
4. The boyfie and I. And I thank God for this wonderful person who love me to bits :)
So what have you been up to lately? :)
Labels:
Appreciation,
College Life,
Happy Things,
Inspirations,
Lately,
Lesson
DIY Bleach/ Faded Jeans
Monday, 22 July 2013
Morning guys! Hope you had a great weekend and all ready for the week ahead! :)
Just want to start this week with something I love, yep, DIY (and I hope it'll turn out well). Firstly it was originally the plan to bleach the jeans to ombre shade but I'm only halfway there for now and I actually quite like the colour of the jeans now so I thought why not I do a post on how to bleach it to a lighter (or faded) shade :)
First off you'll need an old pair of jeans (you don't want to ruin your newly bought ones just in case it doesn't turn out the way you liked). Scissors (really sharp ones with small pointy ends) and sand paper (optional - for the worn out look). Not forgetting also bleach, warm water, and bucket.
Cut your jeans to the desired length and small holes where you preferred it to be. Started fraying them by using the pointy ends of the scissors to pull out small threads at the end of the cut edge (this might take a while depending on how frayed you want it to be).
Optional step: Use a snadpaper to brush it along your jeans for a really worn out look.
After you're satisfied with the way your jeans look, time to fade those colours! I preffered mine to be quite faded so I soak it in 1 part bleach, 3 part warm water for quite sometime. Remember to check the progress once in a while to see how far it has faded.
Note: The water might turn pale yellow but it's okay you can wash it out afterwards (works for me! maybe it'll have to depend on the type of jeans you have).
After you're satisfied with the colour, take it out of the bucket using rubber gloves and wash it a couple of times in the washing machine to remove the bleach and the yellowy stain. Dry it in the dryer and you've got yourself a new pair of lovely faded short! :)
Ps: For a clearer bleaching process/ instructions, google would help. That's how I learnt mine :p Good luck! xx :)
Labels:
DIY,
Fashion,
Happy Things,
Inspirations,
Love
Lately {7}
Thursday, 30 May 2013
Lately it's been all DIY stuff as I gave myself a challenge, that is, to do DIY stuff for a week. So far I've finished 6. Another one to go and I'm done!
Hope your week is as productive as mine! xx :)
Linking up with Heather today! Head over to her blog and check it out! :)
Labels:
Accessories,
DIY,
Happy Things,
Inspirations,
Lately,
Love
Leather Clutch/ Purse
Wednesday, 29 May 2013
And so another day of challenge commence! Found this lovely idea on the internet while browsing out leather projects (yes I know a lot of leather stuff lately!) so I did it! Can't say I'm not please with the outcome. It's really simple and easy (as with all my DIY-es) and come let's do it together! :)
Things you'll need:
Leather fabric
Scissors (one big and one small)
Two faux suede strings
I used the big fabric scissors to cut the leather into a long rectangle and folded it three-ways as shown. If you prefer, just fold it in three equal parts will do too.
This part is a bit tricky. Since I do not own a leather punch, I have to make do with just using a small sized scissors. You can either cut small slits at the side (make sure to measure first the gap you prefer) or poke holes in it using the pointy end (which I did!). After that, weave the faux suede string around the side to kind of stitch it up and make a small pouch. Start from one side, and stop when you reach the middle.
It should looked like this after you've sewn up both sides.
For this part, loop the remaining strings on your fingers and tie it as shown above. After that, cut the bottom part into a fringe.
Inside should look like this.
No sewing needed! And you have yourself a leather clutch/ purse :)
Labels:
Accessories,
DIY,
Inspirations,
Love
Jar of Advice
Sunday, 26 May 2013
Right, so without lingering any longer let's get down to it!
All you need:
A big empty jar
Colour strips with one side blank to write words on
A pen
A bible
Find a quote that you think is nice, write it on the blank side of the strip and fold it into a star!
Pop the star into the jar for further use and now try making more stars!
Simple and easy? I bet it'll look nice once I've filled the jar with colourful stars and use it also as a decor.
Have a blessed Sunday! :)
Labels:
DIY,
Inspirations,
Quotes
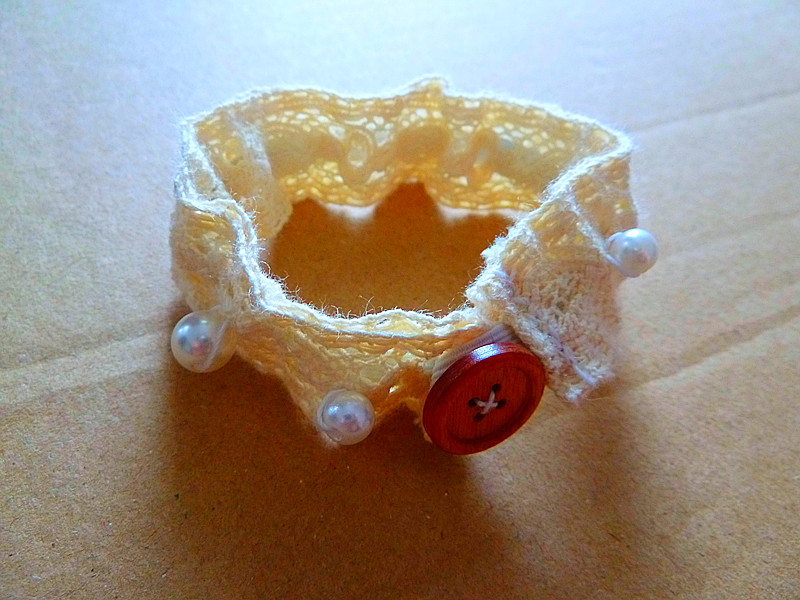
Lace Bracelet
Saturday, 25 May 2013
Happy weekend! Yes I'm very happy weekend's here but one down part though, final exam is in two days' time and I've yet to study some more! :(
Oh wells, gloomy stuff aside, let's talk about creative stuff! Finally after a week of laziness I went out for a mini shopping and also to go get some lovely fresh summer air! It's been awhile cooping up in my room because of warnings that it's not very safe to go out this week (racial stuff very bad I know!).
This time I managed to remember to snap a few in-the-process pictures I hope they helped! One DIY lace bracelet coming right up! :)
Things you need:
Couple of beads or pearls for vintage/ boho feel
An old button to act as clasp (or something!)
Thread and needle
Scissors
Elastic band
Lace ribbon
Measure the length of elastic band around your wrist plus an inch for a small loop. Sew the loop on one end of the elastic (make sure the loop fits the button!).
Measure lace ribbon to be the length of the elastic band plus 1.5 inches. Cut two strips of the same length. Fold the end of the ribbon down a bit and sew a small tiny hem. Apply the same thing for all four ends of the lace ribbons.
Sew two ends of the ribbons just below the elastic loop, while the other ends matching the other end of the elastic band.
Decide which side is to be the top side, and sew on beads or pearls randomly. Add a small button to the opposite end of the loop-ended elastic.
Sew the two opening sides of the bracelet together (make sure you don't accidentally sew them together with the elastic band which I almost did!).
And...you're done! :)
Have a happy weekend! :)
Labels:
Accessories,
Colours,
DIY,
Fashion,
Inspirations,
Love
lately {6}
Thursday, 23 May 2013
Nothing much lately but more to focusing on relaxing and how awesome the weather is. Practised a bit on my camera and finally got the whole bokeh thing! :)
early sunrise :)
Was contemplating about this a lot too lately and I'm still not very sure about it, but yes, I've started a new blog on tumblr, using the name Janyie which I've created (something to do with January which is the month I was born in!). It is more to boho related stuff as I've found out that the style is really nice and it's what I've been searching for all these while but can't seemed to put a name to it (mainly laces, long maxi skirts, native patterns and such), it just occurred to me that it's boho!
Sorry for the noob-iness but well, here is it! A boho inspired blog where pictures, ideas, thoughts and styles are shared. Feel free to visit if boho is your kinda thing! :)
Linking up with Laurie :)
Labels:
Appreciation,
Colours,
Happy Things,
Inspirations,
Lately,
Leisures,
Love
Leather Bag
Thursday, 16 May 2013
From kitchen apron to small exploring bag! Am so loving this simple bag that I'm gonna use it every time I go on my photography adventure! :)
Can't say I'm not pleased with the result. One afterword though: Leather is very hard to sew! :(
Was going around the hypermarket and a few leather aprons caught my eyes. Why on earth would anyone want their apron to be made of leather is beyond me but I saw it as a perfect refashion/ upcycle chance as soon as I saw the variety of colours the aprons have from black to all sorts of brown! Not forgetting to mention it only costs MYR8 per piece!
All you need is:
Leather fabric
Scissors
Not-too-small needle
Thread
And a simple tutorial on the how-do. Hope it's not too confusing! :)
2. Cut a rectangle approximately how big you want your bag to be when folded in half where the dotted lines are right side inside.
3. With the wrong side facing you, sew the sides where the dotted line indicated.
4. This part is tricky and I'll try my best to tell you how. After the sides are sewn, press down the bag until two small triangles can be seen at the bottom sides as shown. Sew where the bold line indicate to give your bag more shape.
5. After finished sewing, flip your bag right side out and you'll get something like this.
6. Cut a small flap for your bag by measuring the width a tad shorter than that of your bag.
7. Sew on to top of bag and make sure you have the right sides correctly matched.
8. Cut a long strip for your bag strap (this may defer to how long you want your strap to be). Make the width twice as wide and fold in half where dotted lines indicated right sides together.
9. Sew the open side and flip it back right side out again after you're done.
10. Sew the strap to the sides of your bag where the X's indicated.
11. Cut two small pattern for the side of your bag and sew it wrong side up on top of where you sew on your strap to give it a more tidy and cute look.
DONE! :)
Ps: Sorry for the messy drawings. Would try to remember take the in-the-process pictures so that the instructions will be clearer! :)
Labels:
Accessories,
DIY,
Inspirations,
Refashion
Tattoo Inspo
Wednesday, 24 April 2013
Last inspiration post for the week. Am really sorry haven't been up to much lately as am busy with packing all the stuff I'm going to move (TOMORROW!). Really can't wait for it to be over, where I can settle down and think up all sorts of decor for my new room! :)
For today, I'm going to show you a few inspiration pictures I've found on Pinterest (seriously one of my favourite sites!) about tattoo. Nope I'm not brave enough to go try a real one (and I do get tired of things easily!), so I thought of doing a temporary one, with tattoo ink!
These are a few I've found and caught my eye. Am thinking of maybe doing one on the back or behind the ear? Hmmm.
Be patient with me while I get ready for moving and settling down. After that, time to do all the projects I've been inspired to do lately! Can't wait! :)
Ps: Updated new button for blog. Do share the love and contact me for more sizes! :)
Labels:
Fashion,
Inspirations
Subscribe to:
Posts (Atom)