Leather & Jeans Pouch
Friday, 31 May 2013
Hey guys how's life? It's finally Friday and today's the last day of my DIY week challenge and I'm bringing you something cute - a leather and jeans pouch! It involves a simple few steps and can be completed in a few minutes. What are you waiting for? Let's get down to it! :)
Things you'll need:
Jeans fabric
Leather fabric
Scissors
Long chain
Button
Needle & thread
Measure how big you want your pouch to be and cut two using the jeans fabric. I want mine around the size of my handphone. For the flap, cut approximately the width a tad smaller than the width of your pouch with any shape you prefer.
Sew on the flap. I sew it on with X's stitches. This will be the back part of the pouch.
For the front part, sew on a button where you want it to be. I added on a bit of decoration with the left over leather fabric I have.
After the front and back are done, sew them together wrong sides facing inwards with a single stitch.
Cut a slit on the flap for the button.
Cut two small slits just enough for the chain to go through at the back part of the pouch.
Done! :)
Labels:
Accessories,
DIY,
Fashion
Lately {7}
Thursday, 30 May 2013
Lately it's been all DIY stuff as I gave myself a challenge, that is, to do DIY stuff for a week. So far I've finished 6. Another one to go and I'm done!
Hope your week is as productive as mine! xx :)
Linking up with Heather today! Head over to her blog and check it out! :)
Labels:
Accessories,
DIY,
Happy Things,
Inspirations,
Lately,
Love
Vintage Stones
Thursday, 30 May 2013
Have you ever wanted to decorate your jewelry beads or stones to make it look more vintage but not sure how to? Well I've tried something on my own and I love it! Maybe you can make it into a ring, a necklace or bracelet charm, the possibilities are endless! Here's a simple how to:
Things you'll need:
Soft and flexible wire
Beads or jewelry stones with a hole in the middle
Scissors
1. Cut the length of wire to be approximately 8 times longer than the beads or stones. Make sure the ends are folded in to prevent scratching.
2. Insert wire through the hole in the middle of the jewelry bead/ stone and position the stone around the middle of the wire.
3. Fold the wire anyway and any direction you please to create a pattern you prefer.
4. Upon reaching the end of the wire, twist the two ends of the wire together as shown.
Done!
Now you can try it out on other shapes and sizes of jewelry beads/ stones instead. Have fun! :)
Labels:
Accessories,
DIY
Leather Clutch/ Purse
Wednesday, 29 May 2013
And so another day of challenge commence! Found this lovely idea on the internet while browsing out leather projects (yes I know a lot of leather stuff lately!) so I did it! Can't say I'm not please with the outcome. It's really simple and easy (as with all my DIY-es) and come let's do it together! :)
Things you'll need:
Leather fabric
Scissors (one big and one small)
Two faux suede strings
I used the big fabric scissors to cut the leather into a long rectangle and folded it three-ways as shown. If you prefer, just fold it in three equal parts will do too.
This part is a bit tricky. Since I do not own a leather punch, I have to make do with just using a small sized scissors. You can either cut small slits at the side (make sure to measure first the gap you prefer) or poke holes in it using the pointy end (which I did!). After that, weave the faux suede string around the side to kind of stitch it up and make a small pouch. Start from one side, and stop when you reach the middle.
It should looked like this after you've sewn up both sides.
For this part, loop the remaining strings on your fingers and tie it as shown above. After that, cut the bottom part into a fringe.
Inside should look like this.
No sewing needed! And you have yourself a leather clutch/ purse :)
Labels:
Accessories,
DIY,
Inspirations,
Love
Leather Necklace
Tuesday, 28 May 2013
DIY week challenge day 4! Leather necklace boho style hope you'll like it! :)
Things you need:
Scissors
Glue gun
leather fabric
faux suede string
Cut the piece of leather fabric around the size you want it to be. I want mine not very big so I cut a mini size one (my advice will be fold the leather in half and cut it for symmetrical shape).
Next, cut fringes as shown for more texture.
Use a glue gun to apply glue where you want it to be. Make sure you don't glue the top part as that's where the faux suede string will be inserted.
Lastly, insert the string at the small openings and tie a knot at the ends. Done!
Easy and simple :)
Labels:
Accessories,
DIY
Lace Bracelet
Saturday, 25 May 2013
Happy weekend! Yes I'm very happy weekend's here but one down part though, final exam is in two days' time and I've yet to study some more! :(
Oh wells, gloomy stuff aside, let's talk about creative stuff! Finally after a week of laziness I went out for a mini shopping and also to go get some lovely fresh summer air! It's been awhile cooping up in my room because of warnings that it's not very safe to go out this week (racial stuff very bad I know!).
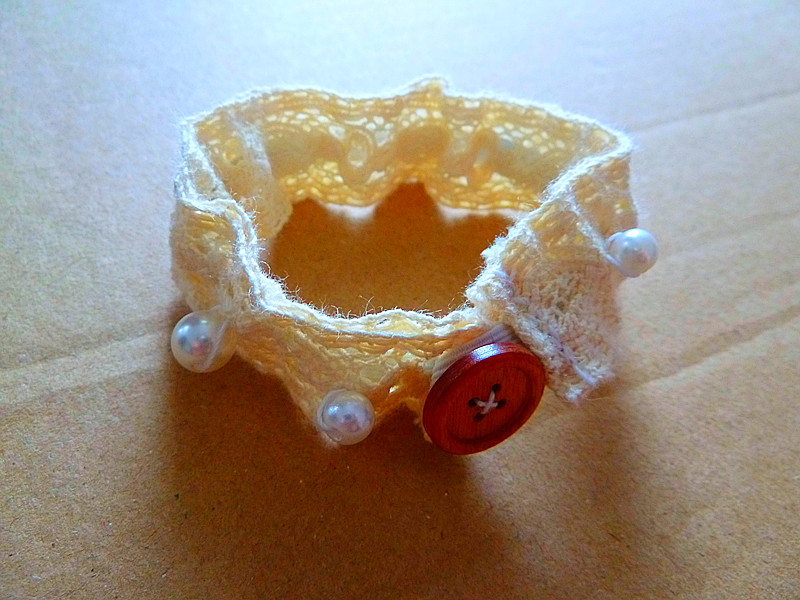
This time I managed to remember to snap a few in-the-process pictures I hope they helped! One DIY lace bracelet coming right up! :)
Things you need:
Couple of beads or pearls for vintage/ boho feel
An old button to act as clasp (or something!)
Thread and needle
Scissors
Elastic band
Lace ribbon
Measure the length of elastic band around your wrist plus an inch for a small loop. Sew the loop on one end of the elastic (make sure the loop fits the button!).
Measure lace ribbon to be the length of the elastic band plus 1.5 inches. Cut two strips of the same length. Fold the end of the ribbon down a bit and sew a small tiny hem. Apply the same thing for all four ends of the lace ribbons.
Sew two ends of the ribbons just below the elastic loop, while the other ends matching the other end of the elastic band.
Decide which side is to be the top side, and sew on beads or pearls randomly. Add a small button to the opposite end of the loop-ended elastic.
Sew the two opening sides of the bracelet together (make sure you don't accidentally sew them together with the elastic band which I almost did!).
And...you're done! :)
Have a happy weekend! :)
Labels:
Accessories,
Colours,
DIY,
Fashion,
Inspirations,
Love
Photography And More
Saturday, 18 May 2013
Whew! 'Twas a tiring day today but definitely fruitful! :)
Had a wedding marathon today, attended two wedding masses and ate tons of food! If this keeps up I can finally have that weight gain I've been wanting since I became as thin as a stick from childhood! :p
Get to take quite a few outdoor pictures and practise a bit of close up shots as today's weather is superb and it feels really like summer now, with the sun shining as bright as ever and not a dot of cloud in sight. Didn't have time to take a proper OOTD photo though as was in a rush so these will have to do, sorry!
Outfit theme: Bright and cheerful a.k.a. polka dots!
Hot day today!
Church adjacent building.
Few odd plants around the church compound. Ain't it lovely to see them bloom? :)
N waiting patiently for me while I ran around here and there taking pictures.
Eagle chain I gave him as our anniversary gift.
Hope I've improve in my photo taking. Can't wait to experiment more!
xx :)
Labels:
Accessories,
Colours,
Fashion,
Happy Things
Subscribe to:
Posts (Atom)


